Depth of Field
Depth of Field (DOF) is the range of distances within the cameras view that are in acceptable focus. DOF is a major source of creative control over your final image. A large DOF puts much of your image in focus. A small DOF puts less of your image in focus.
A large DOF can be either an advantage, or a disadvantage. Limited DOF can be used to emphasize or isolate your subject, and can also be used to convey a sense of distance. Landscape, architecture, and product photographers normally want everything in focus. Macro photographers (bugs, jewelry) usually want their subject in focus. Portrait, animal, and flower photographers often want to draw attention to only one part of the subject, so DOF can be a disadvantage for them. While landscape photographers work very hard to maximize DOF, portrait or flower photographers often work hard to minimize it.
DOF is probably the most important factor in determining whether a photo a sharp. The Carl Zeiss Company in their first newsletter (1997) stated " 'Depth of Field is insufficient' is the most common complaint to meet the Carl Zeiss Service Department today".
Note - the following is an intermediate to advanced guide to understanding depth of field. If the concepts of aperture and depth of field are new to you a great beginners guide is available at https://www.photographytalk.com/beginner-photography-tips/7356-a-beginner-s-guide-to-aperture-and-depth-of-field.
Blur and the Circle of Confusion
The laws of optics create limited Depth of Field. When you focus on a subject all points in the same plane as the subject perpendicular to the axis of the lens will be in sharp focus. Every point on either side of that plane will appear as a small blurred circle on the sensor, rather than as a sharp point. The amount of blur for a given point depends mainly on its distance from the plane of perfect sharpness, the aperture setting, and the focal length. These tiny circles of blur are called the circles of confusion (CoC). A small amount of blur is required by the laws of optics and considered acceptable. There are many different standards for acceptable blur. The three most commonly used are:
- The printed photo should appear sharp to the viewer. This was the most commonly used standard in film days. The standard is simple - An 8 x 10 print should appear sharp to a viewer with 20/60 eyesight at 10 inches.
The standard implies an acceptable blur of approximately .03 mm on a full frame camera. Note that a person with corrected 20/20 eyesight can resolve details three times smaller than a person with 20/60 eyesight so this standard is very lenient. Some people even have 20/10 eyesight and a very few have 20/8 eyesight. Hawks have 20/2 eyesight, i.e. they can see from 200 feet what a human can see from 20 feet! A second problem with this standard is that our work is increasingly viewed in many other ways - e.g. on larger prints, on tablets or projectors, and in presentations where parts of the image are zoomed in on (Ken Burns effect), etc.
The excellent Zeiss newsletter referred to earlier reinforces just how limited this .03 mm standard is. Per Zeiss - "Those who use depth of field scales, tables, and formulas (e. g. for hyperfocal settings), restrict themselves – most probably without knowing why – to the image quality potential of an average pre-World-War-II emulsion."
Lenses, cameras, and printers have improved greatly over the past 60 years. It is time to consider a new DOF standard. If you want to future proof you work you should consider a standard stricter than .03 mm.
Finally, note that the standard of .03 mm is appropriate only for full frame cameras. If you have a compact or APS-C camera you need to divide .03 by the crop factor to get an appropriate CoC. This is because the blur on a smaller sensor must be magnified more to bring the final image to 8 x 10. For example, the print standard for a Canon 7D, which has a crop factor of 1.6, is .03 mm / 1.6 = .02 mm.
- The standards of recognized authorities (various manufacturers, websites). Older lenses have DOF marks on the lens. These marks can be used to imply the DOF standard that manufacturers believe to be reasonable. Some manufacturers explicitly state their standards. Nikon explicitly states in the exif information they attach to raw files that their standard is .03 mm. Canon states in the book "Canon Lens Workbook" that their standard is .035 mm. Kodak's standard is .0291 mm, and Zeiss' is .024 mm. The well-known lens review site www.photozone.de gives DOF several standards. The wording below is theirs:
- 0.03mm (circle-diameter) represents the common standard which is usable for small prints or low-end needs.
- 0.025mm - for printing posters.
- 0.02mm - professional level (also for slides)
- 0.01mm - this level is oriented at the resolution of an average film or lens (about 100 lines/mm=0.01mm). The calculated Depth-of-Field will be sharp by any standard!
- The blur circle should not exceed the line size on the sensor. One line on the sensor is two pixels (one black, one white). Blur should not be so large that lines can no longer be recognized. The blur standard then depends on the sensor size with smaller pixels (tighter lines) implying a tighter standard. For a Nikon D800 the width of a line is .0098 mm. There are 1/.0098 = 102 lines/mm on the sensor. The 102 lines per mm is very close to standard suggested by www.photozone.de, and close to the resolution produced by the very best lenses (100 lines/mm). For a Canon 5D Mark III the calculated standard is .0124 mm, or 80 lines/mm. Small sensor cameras require smaller blur circles, for example a Canon G15 compact camera would require a blur circle of .0038 mm or 263 lines/mm.
Note that the above standards apply at the nearest and furthest points in your image. The amount of blur at points in between will be less, on average perhaps half the amount of blur at these extreme points. So, while a .03 mm standard isn't a very strong one (20/60 vision) at the edges of the image, the average amount of blur over the entire should be well less, perhaps appropriate for a person with 20/30 vision viewing and 8x10 print at 10 inches.
Recommended CoC
With all of the above in mind, what blur standard do I suggest? Very simply, whatever you can get. If most of your image is at far distances where the amount of blur is normally small, I use a blur standard related to the pixel size, i.e. for a D800 I use .01 mm as the CoC. If DOF is a problem, for example when shooting a nearby flower and a mountain in the distance, I'll accept a CoC of .03 or even a bit larger, knowing that people with 20/20 vision won't find the image sharp everywhere, but also knowing that the image will be perceived as sharp if published on the web, or viewed in a smaller size, or viewed by those with less than 20/20 vision.
DOF Theory
This Wikipedia article contains the equations that govern DOF. The size of the blur circle (number of pixels on a digital sensor or diameter in mm on film) depends on several factors. These factors include the distance to the object in question, the focus distance, the focal length of the lens, and the aperture.
The amount of blur at any given distance strongly depends on the focal length and distance between the subject and the focal point. Blur can be very large when the subject is both close to the camera and is much closer than the focus point. DOF depends roughly quadratically on the focal length of the lens, e.g. a 100 mm lens will have 25 times (100/20 squared) less Depth of Field than a 20 mm lens. DOF depends roughly linearly on aperture, i.e. at f/16 you get about twice as much DOF as at f/8. There is a downside to shooting at smaller apertures however, namely diffraction. Diffraction will be covered later in this article.
DOF Easy
Using the Wikipedia equations I have created an application "DOF Easy" that can help you understand DOF. It can also help you select an appropriate focal length, aperture, and focus distance. A web based version of the app is available on this site at https://www.thewave.info/DOFEasy/index.html. An Android version of the app is available on the Google Play Store at https://play.google.com/store/apps/details?id=info.thewave.DOFCalc&hl=en and an iOS version is available in the Apple App Store. Both versions are free. The easiest way to install DOF Easy on your phone or tablet is to open the Google Play or Apple App Store on your phone or tablet and search for DOF Belvin.
DOF Easy is unique among Depth of Field Calculators. With most DOF Calculators you enter the focus distance and the aperture and the calculator tells you whether your scene will render in focus. DOF Easy starts with information about the scene (a range of distances) and DOF Easy tells you where to focus and what aperture to use. It also shows blur amounts as a function of distance. Users can easily see how the amount of blur, in pixels, changes with distance from the focal plane.
DOF Easy is designed to be "easy". While all inputs are required, defaults are available for most of them. Key inputs are saved between runs so they do not have to be re-entered. Key outputs are shown first. These include optimal focus distance and aperture, and the amount of blur at the near and far points in your scene. Blur diameters are stated in simple to understand pixels as well as in millimeters. The hyperfocal distance is also shown. The program also computes a variety of additional outputs. These include information about the sensor, the lens, the diffraction limited aperture, and a detailed table showing how blur changes with distance.
If a field has a dotted underline then additional help on the input can be obtained by clicking or pressing on the underlined text.
Quick Start
- The first step towards achieving optimal depth of field is to determine the focus distance. Focus on the nearest and furthest point in the scene and read the distances to each from the focus ring, or estimate them.
- Enter the near and far distances into DOF Easy and click on the small green calculator icon next to the Focus Distance field. This will fill in the Focus Distance field. This distance is where you should focus. Of course you can also enter any distance into the program that you wish to, but the calculated distance is optimal.
- Enter the camera format, DOF standard, focal length, and aperture into DOF Easy. For aperture I suggest you start the process two stops above the lowest f-stop of the lens.
- Click on the Calculate Results Button.
- In the Results section the rows containing the blur at near distance and blur at far distance should be in green. If not then you need to increase the f-stop until they are. The easiest way to do this is to look at the Required Aperture field. Set the f-stop just above the Required Aperture.
- If you cannot bring the blur to within an acceptable range by increasing the f-stop there are other ways to do so. These include the methods of "focus bracketing", "shoot wider and crop", or using a tilt shift lens. More information about these methods can be found at https://www.thewave.info/DOF/DOF.html .
Inputs
Camera Format provides information about the size and aspect ratio of the sensor. DOF Easy saves this information when you exit the program. It reloads the Camera Format on next use. Camera Format is used to calculate the crop factor and the effective focal length of the lens. It is also used to determine the standard of blur, commonly known as the circle of confusion (CoC). If you do not know the Camera Format you can search for it at https://www.digicamdb.com.
The Blur Standard, together with the Camera Format, determines the acceptable Circle of Confusion (CoC). The CoC is an optical spot caused by light rays not coming to perfect focus when a point source is imaged. When the CoC is small an image is perceived as sharp. What is perceived is sharp depends on the observer's vision, whether the image is viewed as a print, on screen, or via a projector, and on the viewing distance.
Four different general standards are available in the program: Normal, Fine, Professional, and Ultimate. The "Normal" standard is the historical criterion of .03 mm. This standard is good for prints of up to 8 inches by 10 inches when viewed at ten inches by a person of normal vision. It is also good for web use. A "Fine" standard of .024 mm that is 20% sharper is also available, as are a "Professional" standard of .02 mm or 50 lines/mm, and an "Ultimate" standard of .01 mm or 100 lines/mm which is close to the resolution of modern day sensors. The last two standards should only be used with the very sharpest of lenses. All four standards .03, .024, .02, and .01 apply to Full Frame cameras. For other formats the effective CoC is the Blur Standard divided by the Crop Factor. For example if "Professional" is chosen as the blur standard and "Canon APS-C" the Camera Format the final CoC is .02 / 1.6 = .0125.
The program also allows you to enter the acceptable CoC directly. Values between .001 and .05 are available. No Crop Factor adjustment is made to the CoC in this case.
The program also saves the "Blur Standard" choice between runs so it only needs to be entered once.
Focal length is the actual focal length of the lens, not the full frame equivalent.
Aperture strongly affects depth of field. Except for macro work the hyperfocal distance is inversely proportional to the aperture, so doubling the aperture, say from f/8 to f/16 will decrease the hyperfocal distance by a factor of 2.
When selecting an aperture keep both lens quality and diffraction in mind. Lenses are usually their sharpest one or two stops slower than wide open. For example, an f/2.8 lens would be sharpest when shot at f/4 or f/5.6. Due to the effects of diffraction lenses start losing resolution at about f/11. Resolution at f/16 is typically about 20% less than resolution at f/8, and resolution at f/22 is about 50% less than f/8.
Near Distance is the distance to the closest point in the scene. Also enter the units of measure. Distances can be entered in feet, inches, meters, or centimeters.
Far Distance is the distance to the furthest point in the scene.
Focus Distance is the distance at which the lens is focused. It is filled in automatically when you enter the near and far distances into the program and click or press on the small green calculator icon. The calculator icon computes the harmonic mean of the near and far distances, which is mathematically the optimal focus distance.
The focus distance can also be entered directly in the event that you do not wish to focus at the optimal point. This could be the case if you wish the background to be blurred, or if you wish the foreground or background to be a little sharper than the rest of the image.
Key Results
Optimal focus distance is the distance at which you should focus in the absence of unique conditions. It depends only on the distances to the closest and furthest points in the scene and is independent of focal length and aperture. It is the harmonic mean of the near and far distances. If nd is the closest point in your image, and fd the furthest, the harmonic mean is given by
harmonic mean = 1/(average(1/nd,1/fd))
When the far distance fd is infinity the harmonic mean is just twice the near distance. For all distances the harmonic mean is less than the average of the near and far distances, i.e. you should always focus closer to the nearest point than the average.
Required Aperture is the smallest f-stop at which objects at the near and far distances will be in sharp focus. Sharp focus is defined as blur less than or equal to the acceptable CoC. The required f-stop is calculated assuming you have focused at the Optimal Focus Distance.
Nearest Sharp Point is the distance to the closest point in the scene that will be in sharp focus. Sharp focus is defined as blur less than or equal to the acceptable CoC.
Furthest sharp point is the distance to the furthest point in the scene that will be in sharp focus. Sharp focus is defined as blur less than or equal to the acceptable CoC.
Total depth of field is the difference between the far and near points of acceptable focus. It depends on where you are focused, the CoC, and the aperture.
Blur at Near Distance (mm) shows the amount of blur on the sensor of the closest point in the scene. It is defined as the diameter of the blur circle on the sensor in mm. The Blur at Near Distance is color coded. When the amount of blur is less than or equal to the acceptable CoC the Blur at Near Distance is shown in green, with darker colors indicating less blur.
Blur at Far Distance (mm) shows the amount of blur on the sensor of the furthest point in the scene. It is defined as the diameter of the blur circle on the sensor in mm. The Blur at Far Distance is color coded. When the amount of blur is less than or equal to the acceptable CoC the Blur at Far Distance is shown in green, with darker colors indicating less blur.
Blur at Near Distance (pixels) shows the amount of blur on the sensor of the closest point in the scene. It is defined as the diameter of the blur circle on the sensor in pixels. The Blur at Near Distance is color coded. When the amount of blur is less than or equal to the acceptable CoC the Blur at Near Distance is shown in green, with darker colors indicating less blur.
Blur at Far Distance (pixels) shows the amount of blur on the sensor of the furthest point in the scene. It is defined as the diameter of the blur circle on the sensor in pixels. The Blur at Far Distance is color coded. When the amount of blur is less than or equal to the acceptable CoC the Blur at Far Distance is shown in green, with darker colors indicating less blur.
The Hyperfocal Distance (HF) is the shortest distance beyond which all objects can be brought in into acceptable focus. It depends on the aperture of the lens and the CoC. Note than when you are focused at the hyperfocal point all objects between the hyperfocal distance divided by two and infinity will be in sharp focus.
Note that the hyperfocal distance is not the distance at which you should focus your camera! Focusing at the hyperfocal distance is a mistake many photographers make. Before smartphones became readily available landscape photographers would carry "Hyperfocal Charts" with them on shoots. The charts showed, for a variety of apertures and focal lengths, the hyperfocal distance. If the scene includes very distant points you could quickly determine the aperture to use and get a good idea of where to focus since all point between the hyperfocal divided by 2 and infinity will be in sharp focus.
If the nearest point in the scene is further than the hyperfocal distance then focusing at the HF is not optimal. You will get a sharper image if you focus further out. Focus at twice the distance to the closest object in the scene.
The Acceptable Circle of Confusion (mm) (CoC) is the amount of blur in mm that is acceptable in the final image. It is computed from the Camera Format and the Blur Standard.
The Acceptable Circle of Confusion (pixels) is the amount of blur in pixels that is acceptable in the final image. It is computed from the Camera Format and the Blur Standard.
Sensor Information
Fields here are shown for information only.
The diagonal, width, and height fields show the size of the sensor in millimeters.
The Pixels/mm field shows the number of pixels per millimeter of the sensor. This field is used to convert blur amount in mm to blur amounts in pixels.
mm/Pixel shows the size of a pixel on the sensor.
Lines/mm is Pixels/mm divided by two since one line consists of both a light pixel and a dark pixel.
Area/mm2 show the area covered by the sensor.
The Crop Factor is the ratio of the diagonal of a full frame camera (43.3 mm) to the sensors diagonal. Typical crop factors are 1.6 for a Canon APS-C camera, 1.5 for a Nikon DX camera and 2.0 for a Micro 4/3 camera by Olympus or Panasonic.
Lens Information
Fields here are shown for information only.
The Full Frame Equivalent Focal Length of a lens is the actual focal length times the crop factor. The FFE focal length is used to calculate the horizontal and vertical angles of view.
Horizontal field of view is the width in feet or meters of the observable world seen at the focus distance. It can be calculated as
Horizontal FOV = focus distance × (36/FFE focal length).
Vertical field of view is the height in feet or meters of the observable world seen at the focus distance.
Horizontal angle of view is expressed in degrees. It depends only on the full frame equivalent focal length and the aspect ratio of the camera.
Vertical angle of view is expressed in degrees.
Diffraction
The Airy Disk Diameter (mm) is the size of the blur spot caused by diffraction. It is a function of lens aperture. Stopped down lenses produce larger airy disks (blur). It is also a function of color temperature with reds showing the largest airy disks and blues the smallest. Blur Calculator uses 5250K as the default color temperature. 5250K is the color temperature of typical daylight. Airy disk size increases linearly with aperture, so an image stopped down to f/22 would have an airy disk nearly three times (22/8) larger than one at f/8.
Airy Disk Diameter (pixels) is Airy Disk Diameter (mm) × Pixels/mm. As sensor pixel density increases the size of the airy disk in pixels also increases.
Diffraction Limited Aperture is the aperture at which the airy disk exceeds one line pair (2 pixels) in size.
Blur Details
This section shows the amount of blur at various distances. Amounts of blur on the sensor are shown in both pixels and millimeters. Rows are highlighted in green when the amount of blur is less than the acceptable CoC. Darker greens indicate less blur.
Sample Input and Output:
Sample Uses:
There are a great many uses for DOF Easy. Here are some examples. All the numbers in the examples are based on the use of a Nikon D810 camera. Conclusions would not be changed if a different full frame camera was used.
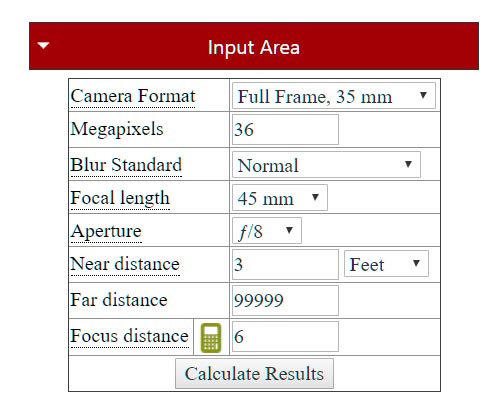
1. Your subject is a flower bed 3 feet away, and some mountains far off in the distance. The composition calls for a 45mm lens. Is it even possible to get enough DOF? If so, where should you focus?

Solution: The Nikon d810 is a 36 megapixel full frame camera, so I entered this into the Input Area of DOF Easy as seen here. Clicking on the green calculator icon yields an optimal focus distance of 6 feet which is entered in the focus distance box automatically. Clicking on the Calculate button gives a required aperture of f/37.8 which is beyond the range of all 35 mm lenses, so it is not possible to capture this image with the required sharpness. If you enter a typical maximum aperture of f/22 you can determine the amount of blur at various distances from the "Blur Details" Section. At infinity there would be 15 pixels of blur, and at three feet around 11 pixels of blur. Later in the article I will discuss ways this subject could be handled.
2. Your subject is leading lines on a rock. The closest point on the rock is at five feet, and the furthest 20 feet. The focal length is 35 mm. Where should you focus and what f stop should you use?

Solution: Enter five feet as the near distance and 20 feet as the far distance and click on the green icon. This yields an optimal focus distance of eight feet. Clicking of the Calculate button the required aperture is f/10.2. Rerun the calculator at f/10. At f/10 the blur at five feet is about 6.3 pixels, and at 20 feet it is also about 6.3 pixels. Both are just beyond the acceptable CoC of 6.1 pixels. Focusing closer would improve the blur at five feet, but make the blur at 20 feet larger. Focusing further out increases the blur at five feet dramatically. The Airy Disk diameter (diffraction blur) at f/11 is also reasonable at .0135mm or 2.7 pixels. I would prefer to shoot at a lower f stop so that diffraction is not an issue, but this is not possible here.
Diffraction
When light waves travels through a small hole (e.g. the aperture of a camera, or the pupil of your eye) the waves interfere and being to disperse, creating blur. For an ideal circular aperture the blur pattern is called an Airy Disk. The size of the Airy Disk depends on the wavelength of the light, and the size of the aperture. The smaller the aperture (higher f stop) the larger the amount of diffraction blur. Diffraction limits the best possible resolution of the human eye to 20/8 vision. Hawks have larger pupils (lower f stops) so the impact of diffraction is less which makes 20/2 vision possible.
A camera is said to be diffraction limited when the size of the Airy Disk exceeds two pixels in size. The Blur Calculator tool above shows for a given aperture the diameter of the Airy Disk in both mm and pixels. The size of the Airy Disk varies linearly with aperture, i.e. at f/16 the Airy Disk is twice as big as at f/8. The Blur Calculator also displays the diffraction limited aperture. For a Nikon D800 this occurs at an aperture of f/7.3. Finally note that while the diameter of the Airy Disk varies linearly with aperture, the actual amount of diffraction blur varies a bit slower than this. Here is the result of a simulation showing the effect of diffraction at various apertures on the effective resolution of a Nikon D800E:
| Aperture | Lines/mm |
|---|---|
| f/4 | 95.3 |
| f/5.6 | 84.4 |
| f/8 | 70.4 |
| f/11 | 57.0 |
| f/16 | 42.3 |
Below f/4 lens imperfections often overwhelm any gains due to less diffraction at a larger aperture. As a general rule you should shoot at apertures below f/4 (on a full frame camera) only when you need short exposure times to minimize motion blur, or when you want to create blur for creative reasons. Finally, note that Compact Cameras generally have very small apertures and small pixels and are very subject to diffraction. Here is a table showing the diffraction limited apertures for some typical cameras:
Camera - Format |
Megapixels |
Diffraction limited at |
|---|---|---|
Nikon D800 - 35mm |
36.3 |
f/7.3 |
Canon 5d2 - 35mm |
21.0 |
f/9.5 |
Canon 7D - APS-C 1.6 CF |
18.0 |
f/6.3 |
Nikon D7000 - APS-C 1.5 CF |
16.2 |
f/7.1 |
Nikon S8200 - 2/3" |
16.0 |
f/3 |
Canon G11 - 1/1.7" |
10.0 |
f/3.1 |
Ways to increase Depth of Field:
The traditional and easiest way to increase Depth of Field is to increase your f stop and to choose an appropriate focus point. DOF Easy helps you do this. As a general rule do not focus at more than twice the distance to the nearest point you wish to be sharp. For example, if you have a flower at two feet that needs to be sharp, do not focus the camera at a distance exceeding four feet. You should keep diffraction in mind when setting your aperture. If DOF Easy indicates that you need an f stop bigger than f/16, consider using another method to increase DOF.
2. Use a Compact or small sensor camera, or an APS-C camera
Here's an example comparing the DOF of a Canon 5D Mark II, and Canon 7D, and a Canon SX50HS. The CoC used was the traditional print CoC, f/22 for the 5D II and 7D, and f/6.3 for the SX50HS (close to the SX50's highest f stop), and a full frame equivalent focal length of roughly 60mm. The SX50HS is Canon's latest super zoom. It was included in the table because it has a small sensor size and because it has a high maximum aperture of f/6.5. Both of these increase Depth of Field.
| Camera | Print CoC (mm) |
Hyperfocal Distance (ft) |
Nearest Sharp Point (ft) |
Airy Disk Diameter (mm) |
|---|---|---|---|---|
| Canon 5D2 | .03 |
18.1 |
9 |
.0296 |
| Canon 7D | .02 |
12.9 |
6.5 |
.0296 |
| Canon SX50HS | .005 |
9.8 |
4.9 |
.0085 |
As can be seen in the table, the small sensor cameras have more DOF at the largest f stop. There is a big downside though. Both the 7D and the SX50HX are significantly more subject to diffraction than the Canon 5D Mark II and the SX50HS is only a 12 megapixel camera versus 21 for the 5D Mark II. Remarkably the SX50HS is diffraction limited at its widest aperture of f/3.4, diffraction starts to set in at f/3.1. In my opinion these disadvantages more than offset the gain in increased DOF, especially for the SX50HS. Rather than using a compact camera to increase DOF consider this next recommendation.
For example, instead of shooting at 50mm, shoot at 24mm and crop 3/4 of the picture out so that you get the composition you want. You will lose 3/4 of your pixels but may still have enough left for a moderate sized print. This table from Photozone shows how many pixels are needed for different size prints at 300 dpi (magazine quality):
| Megapixels | Resolution | Print Size (300 dpi) |
|---|---|---|
| 2 MP | 1600 x 1200 |
4" x 6" |
| 3 MP | 2048 x 1536 |
5" x 7" |
| 4 MP | 2400 x 1600 |
6" x 8" |
| 6 MP | 3000 x 2000 |
7" x 10" |
| 8 MP | 3600 x 2400 |
10" x 14" |
| 12 MP | 4200 x 2800 |
16" x 24" |
In our example, if you shot with a Nikon D800 even after cropping you would have 8 - 9 megapixels left, enough for a 10" x 14" print. If you shot with a 5D Mark II you would have five megapixels left, enough for a 6" x 9" print.
If you want to use this technique with DOF Easy enter everything as usual except for the CoC which needs to be smaller since after cropping you will need more magnification to get to a given size print. In our example, if you normally use the Print CoC of .03 mm, and you want to shoot at 24 mm instead of 50 mm, you should reduce the CoC to .03mm x (24/50) or about .015 mm. The calculated Hyperfocal distances will then be correct.
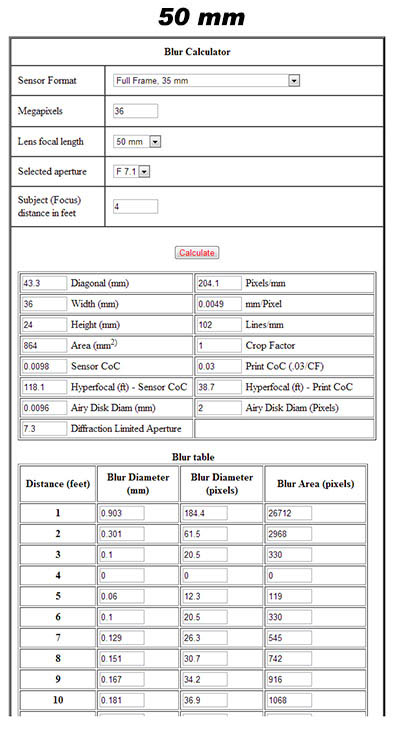
Here is a comparison showing the amounts of blur for two shots, one at 50 mm, and one at 24 mm. The blur sizes would have to be multiplied by 50/24 on the 24 mm run to be comparable. Even so, you can easily see that the image shot at 24 mm will be sharper almost everywhere:
 |
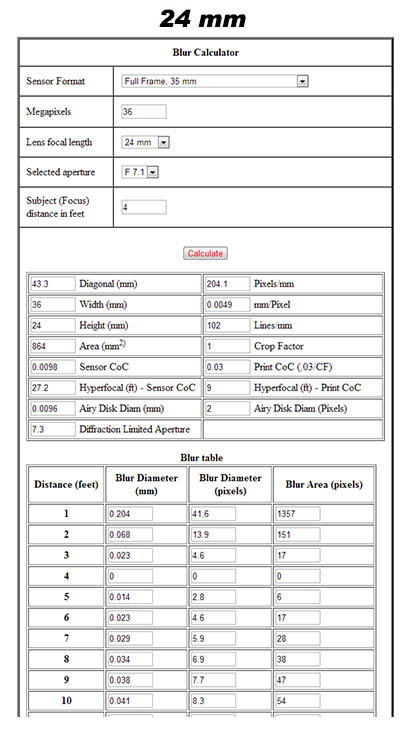 |
Focus here is at four feet, and I used f/7.1 as the aperture to accentuate the differences in the DOF of the two lenses. As soon as you get about a foot away from the focus point the 24mm image becomes sharper. For example at five feet the 24mm image is sharper, 5.6 pixels blur (remember multiply by 2 to get a valid comparison) versus 12.3 pixels at 50mm. Diffraction would be the same for both images since it only depends on aperture and not on focal length. Of course there is a downside to this technique, the area around the focus point will be sharper in the uncropped 50mm image.
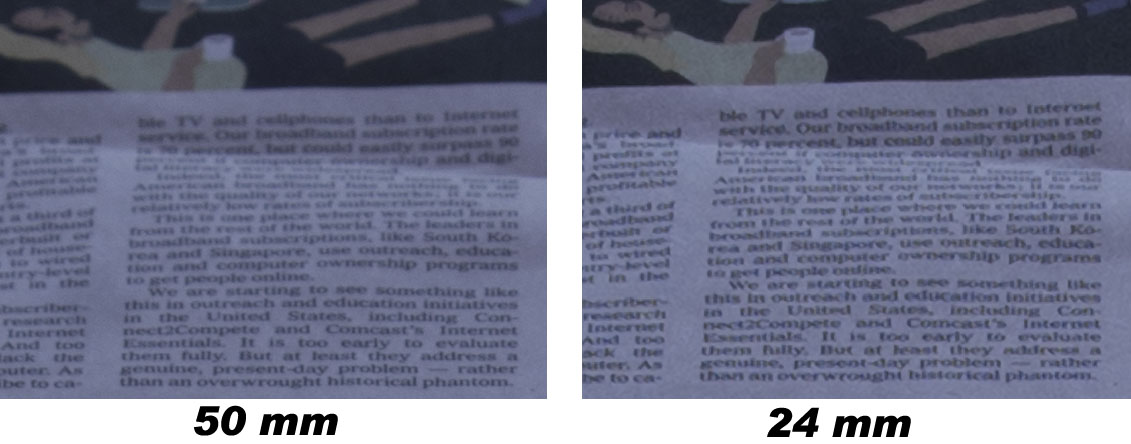
To verify that this method of improving DOF works in practice, I shot a test image of some newsprint at 50 mm and 24mm. The 24mm image was upsized after cropping so that both images could be directly compared. Even without the upsizing the 24mm image was visibly sharper on screen. Here are the results:
Near the focus point - the 50mm lens is clearly sharper

A foot closer

A foot further
As soon as we move away from the focus point the 24mm lens is sharper.
To summarize our example - The 50mm image was sharper within a few inches of the focus point, but as soon as you got more than about six inches from the focus point the cropped 24mm image was sharper. This is an experiment anyone can easily do for themselves; tape a few pages from a newspaper together to make a long target. Set up your camera on a tripod with mirror lockup at f/7.1 and fill the frame with the newspaper target at 50mm. Focus about 1/3 into the scene using Liveview and shoot the target. Then reshoot at 24mm focusing on the same point. You'll be able to easily see the difference in sharpness on your computer screen.
When I first started shooting my instructor gave me two rules:
- f/16 and be there!
- Shoot tight
I now routinely violate the first; I try to shoot at f/8 or lower whenever possible to minimize diffraction. I occasionally violate the second when DOF is a problem, in these cases I can get a better result by shooting wide and cropping.
4. Tilt-Shift Lenses, View Cameras
By using the Tilt feature on Tilt-Shift lenses, objects in any plane can be brought into sharp focus, rather than just objects in the plane parallel to the front of the lens. Of course the objects still must lie in a plane or be close to it for a Tilt-Shift lens to work its magic. There are several disadvantages to Tilt-Shift lenses - they are manual focus, you must not only focus the lens but you must also adjust the tilt to get a sharp image, they are only available for a small number of focal lengths, and they can be expensive. They often work when all other methods fail though. If you want learn more about how to focus a tilt-shift lens you should see this article on The Luminous-Landscape.
5. Focus Bracketing and Focus Stacking
When it works, Focus Bracketing is an excellent way to increase DOF. Focus Bracketing involves shooting the same scene several times varying the focus point (distance) between shots. The resulting images are then brought into Photoshop or other software which then creates one image consisting of the in focus parts of each of the individual images. Focus Bracketing works best when there is little movement in the scene. Images with moving flowers, grass, clouds, or water cannot be easily handled using focus bracketing.
Start the bracket with the nearest object in the scene. Gradually move to further objects, either by focusing on them, or by moving the focus ring on the lens. The number of images required in the focus bracket depends on how sharp you wish the final image to be. This in turn depends on the CoC, the focal length of the lens, the aperture, and the near and far distances in the scene. The following table shows the number of images required.

The table was computed using a CoC of .015 which is conservative and should result in good alignment of the images in the bracket, and good sharpness within each image. If you wish to use a less demanding CoC just divide the number of images by the ratio of the new CoC to .015. For example, if you wish to compute the table using a COC of .03 divide the number of images by .03/.015 or two. It was also computed at f/8, an aperture where diffraction is not that significant and where lenses are typically sharp. If you which to compute the required number of images at a different aperture divide the number of images by the new aperture/8.
The table shows the number of images to go from near distance to infinity. If the far distance is less than infinity you can calculate the required number of images by subtraction. For example, at 50mm if you wish to go from 4 to 12 feet the required number of images is 18 - 6 = 12.
A zip file containing an excel worksheet with the calculations and the intervals that underlie the calculations can be downloaded here . The intervals are calculated as follows. The first interval starts at the minimum focus distance (mfd) of the lens. It ends at the furthest point in focus given the focal length, CoC, and aperture. The next interval starts assuming focus at the end of the prior interval and ends at the furthest point in focus given the focal length, CoC, and aperture. The process is repeated until the far point in focus reaches infinity. You will need the intervals in the worksheet if your camera does not do automatic focus bracketing.
Manual focus bracketing is done by taking a series of images focused at the distances in the table above. Rotate the focus ring on the lens barrel and using the lens distance markings. Alternatively focus at different points in the scene at roughly the distances indicated by the excel worksheet. Try using Liveview autofocus to focus since in Liveview you can place the focus points all the way to the edge of the frame, or focus manually. For many people the autofocus system in the camera will be more accurate than manual focus. Personally I only focus manually when I cannot achieve autofocus. Liveview focus is often more accurate than focusing using the cameras normal AF system. Liveview focus does not suffer from front or back focus problems. Liveview is often slower than normal AF, but can be more accurate. Shoot in manual mode so that the aperture and exposure is the same for every image in the series. A tripod is required.
Some cameras, such as the Nikon D850 and the Olympus OM-D E-M1 Mark II, perform automatic bracketing. Start the bracket by focusing on the nearest object. Automatic focus bracketing is enabled in the camera's menu system. Specify the total number of images you want to include in the bracket and an interval between images. The interval is a number between 1 and 10 with one being the shortest movement of focus and 10 the longest. The interval is hard to relate to distance in the scene. Images stop being taken once you get to infinity, or you get to the maximum number of images. The actual number of images taken depends on the aperture and focal length of the lens. Before going out on a shoot I suggest you do so tests at home to get a feel for how to set the interval. For example I currently shoot with a Nikon D850 and sometimes a Sigma 24-105 Art. Here is a partial table showing the number of images the D850 and Sigma 24-105 took to go from the minimum focus distance of 1.5 feet to infinity:

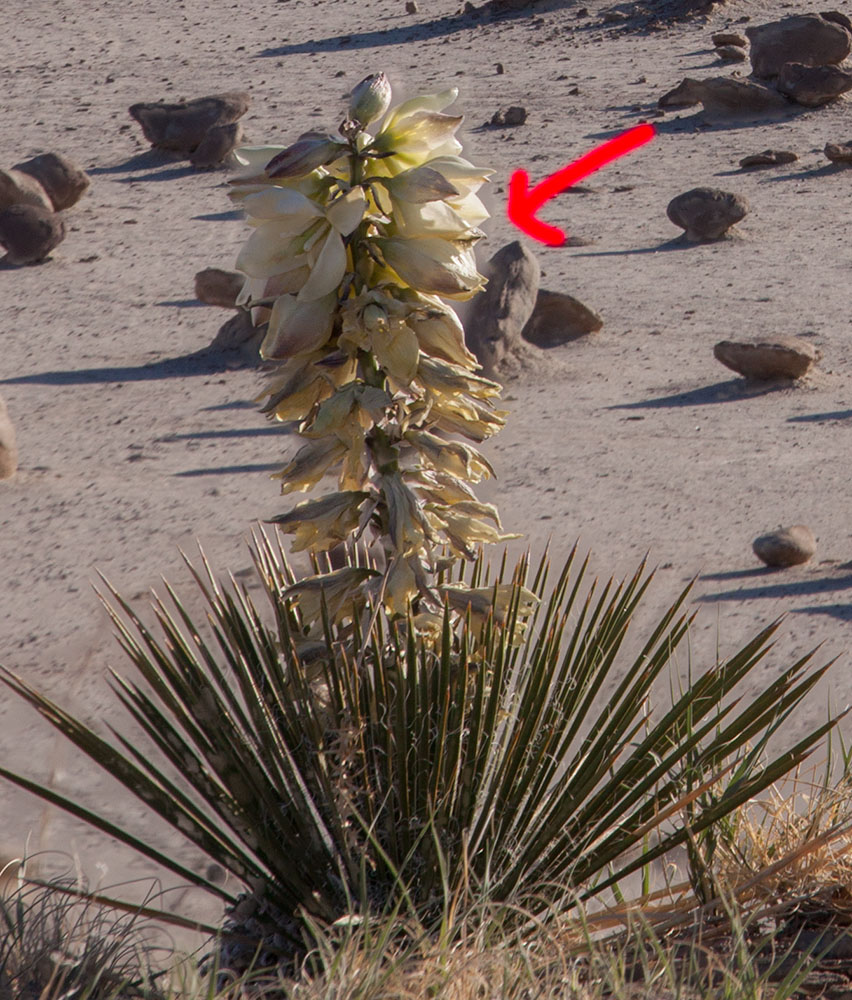
Focus Bracketing cannot handle images where there is a sharply defined border between something close in the image and something much further away. To understand why this is so consider the scene below. The scene has a Yucca at two feet, and a rock garden at fifty feet with the yucca silhouetted against the rock garden. I wanted both the Yucca and the rocks in focus. I focus bracketed shooting two images, one focused on the Yucca, and one on the rocks. The image focused on the Yucca has the flower perfectly sharp but the rocks were badly blurred. The image of the rocks was also perfectly sharp, except for one area, namely the edge where the Yucca meets the rocks. The otherwise sharp background is blurred here, not because the background is out of focus, but rather because the blur circle of the Yucca gets in the way of the background. Neither image will have this area in sharp focus. Below is the result of the Focus Bracket. Only a small portion of the final image is shown. Note how the entire edge where the Yucca meets the background is blurred. Again, this occurs because the foreground blur gets in the way of the sharp background. Since neither image in the bracket has a sharp edge, there is no way for any focus bracketing software to fix the problem.
Incidentally, I could have gotten this image if I had shot wider and cropped, as described in 3. above, but I didn't know this technique then.
Because of this problem, Focus Bracketing works best when there is a continuous gradation in distance between the foreground and background.
I normally use Photoacute to stack the resulting images into a single "in focus" image, but there are other good alternatives. Focus Bracketing software I'm familiar with includes Photoshop (CS4 and later), Photoacute, Helicon Focus, and Zerene Stacker. All of these have trial versions so you can do some testing and decide which you like best. If you're familiar with Photoshop I suggest you start there. To stack with Photoshop proceed as follows:
- Create a single file with all of the images stacked on top of each other. The first layer should be the image in closest focus, followed by the image slightly further out, etc.
- Select all the layers (control click on each layer in the layers window) and click on Edit>Auto align layers.
- After Photoshop aligns the images Select Edit>Auto blend layers.
- After the blending is complete you will get an image with the border out of focus, just crop the border out and you are done. The whole process is very easy if you know how to work with layers in Photoshop.
I focus bracket most of my stationary subjects where there are objects in both the close foreground and background.
Since telephoto lenses have such limited DOF it is logical to ask - what if I move closer to my subject and use a wider lens instead of staying put and using my telephoto? While there is some slight variation in total DOF, for a given field of view you do not gain appreciable DOF by either shooting wider or longer. For example, a 20mm lens focused at 2' with a CoC of .03mm at f/8 has a DOF of 1.617', with the near limit of acceptable sharpness equal to 1.477', and the far limit equal to 3.095'. A 50mm lens focused at 5' feet has the same field of view as a 20mm lens at 2'. For the 50mm lens the total DOF at f/8 and 5' is 1.444', the near limit of sharpness is 4.38', and the far limit is 5.824'. While the total DOF is nearly the same for the two situations, the 20mm lens has less of its DOF in front of the subject (32.3% = {2-1.477}/1.617) than the 50mm lens where 42.9% of the total DOF is in front of the subject (42.9% = {5-4.38}/1.444). For the wider lens there is a more gradual decrease in sharpness in the background as you move further from the subject. This is viewed as desirable by some landscape photographers.
This method is different from that in number 3 above. In this method you move the camera between shots so that the field of view is the same. In method 3 you shoot both images from the same point and get the same field of view by cropping in software.
Focusing Tips
- 1. When shooting landscapes use Liveview to focus the camera, rather than the camera's normal autofocus system. This will eliminate front and back focus issues.
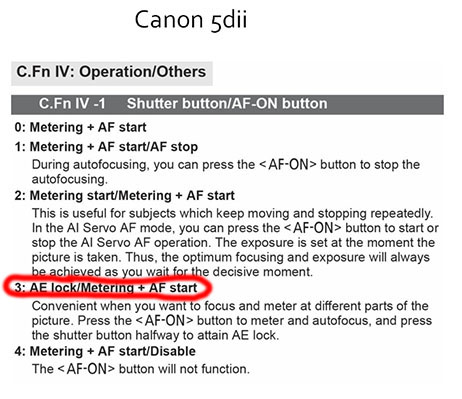
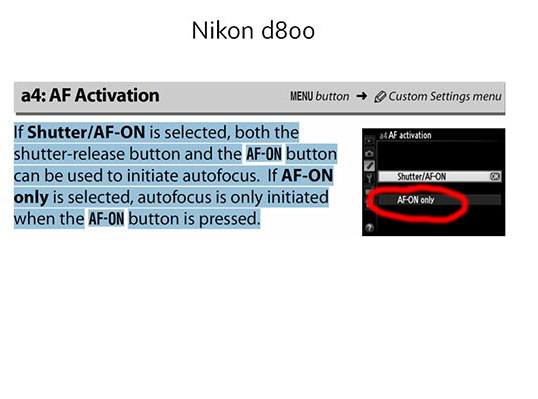
- 2. I suggest you map autofocus off of the shutter button. By doing so the camera will autofocus only when you tell it to, not every time you shoot a picture! I move autofocus off the shutter button and onto the AF-ON button. This is done using the Custom Functions menu IV on Canon cameras (select option 3), and Custom Settings a4 on Nikon cameras (select option AF-ON only).
- Light up the scene with a strong flashlight.
- Use the camera's center AF point to focus. The center AF point is a sensitive cross type AF point and works better than the other AF points, or Liveview focus.
- Use a laser pointer to light up a point. Green laser pointers work the best. If you cannot autofocus on the laser dot, try to focus manually using Liveview. To do this zoom in on the laser dot on the rear screen in Liveview and manually turn the focus ring until the laser dot is as small as possible. Caution - laser pointers are not toys. Do not shine them at people or animals or use them to point out objects in the night sky unless you are sure no planes are present. If your pointer is more than five milliwatts you should wear laser goggles to protect your eyes. The website http://www.laserpointersafety.com/ has a lot of good information on how to use a laser pointer safely.
- At night you may be able to focus on the Moon or on Venus or Jupiter or even a bright star.
- Take several shots manually turning the focus ring between them. This is another way to Focus bracket and is very quick. After each picture review the image on the rear LCD screen (called chimping) to check if the image is in focus.
 |
 |
3. If you're trying to focus at the hyperfocal distance or at another known distance, select a point at roughly that distance and focus on it. Do not rely on your lens markings.
4. In dim light it can be very difficult to focus, especially on far objects. Do not rely on your lens "Infinity" mark to focus at infinity, it can be way off. In dim light you can try the following:
5. If you will be shooting the night sky focus at infinity and not at the hyperfocal. You need the stars to be sharp and may need to accept some blur in the foreground. After focusing at infinity use gaffer's tape to lock down the focus ring so that you do not accidentally move it in the dark. Gaffer's tape is easily removed.
Other Sources of Information (click to link)